No doubt that files can be transferred via pen drives but what if the need arises to reinstall the Operating System in case of a system crash or if the requirement is to install the new Windows 7? What then? How would it be if you upgrade or re-install your Windows OS via a flash drive? There are a number of ways in which you can load or install Windows XP, Vista or Windows 7 from the USB Pen Drive. I am going to show you the easiest way to create your own bootable pen drive.
To begin with you will need a PC with a CD/DVD ROM drive, the Windows CD/DVD, and a 2GB pen drive if you are creating a Windows XP bootable USB or a 4GB pen drive if the requirement is for creating a bootable Windows Vista/7 USB drive. To start with, download and extract the program – WinToFlash. Once extracted execute the file called “WinToFlash” and follow these simple steps.
- Click the ‘Windows Setup transfer wizard’ and select ‘Next’.

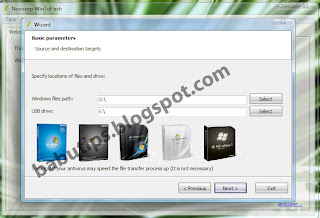


- Here you will need to define two paths where the ‘Windows File Path’ points to the location of the Windows installation disk and the ‘USB Drive’ specifies the location of pen drive that will be used for creating the bootable installation routine. Click on ‘Select’ and choose an appropriate path for both.
- Accept the ‘Windows License Agreement’ and click on continue.
- Don’t panic! The ‘Warning’ is just to remind you that the pen drive will be formatted before proceeding. Click ‘OK’ to proceed or ‘Cancel’ in case you inserted the wrong pen drive or want to check it.That’s all that needs to be done to be able to create a bootable Windows installation pen drive. To be able to boot from the pen drive you will need to access the BIOS and change the boot priority to ‘Removable disk’. If the settings are right you will be able to boot and proceed with the installation of Windows.